What is the ISO on a camera and what role does it play in photography?
Firstly let me explain ISO as it’s a strange acronym to use and certainly seems to have no direct bearing on what it describes, which is the sensitivity of the camera’s built-in sensor to light.
Contents
The Reason It's Named ISO ... it's not what you think
To understand the definition of ISO in photography I think it is important to clear a small misconception about the origin of the term ISO.
The following may sound a bit pedantic but bear with me as it has an important bearing on the pronunciation of ISO and is interesting.
It is widely, and incorrectly, believed that ISO is an acronym for an organisation called the “International Standards Organisation’ when no such organisation actually exists. It is however an abbreviation (not acronym) adopted by the International Organisation for Standardization.
Why ISO and not IOS?
Because the name “International Organisation for Standardization” is something completely different in other languages.
For example in French it is Organisation Internationale de Normalisation and in Russian Mezhdunarodnaya Organizatsiya po Standartizatsii.
The use of the first letters in the name, as is usual with an acronym, would have caused confusion for amongst non-English speakers .
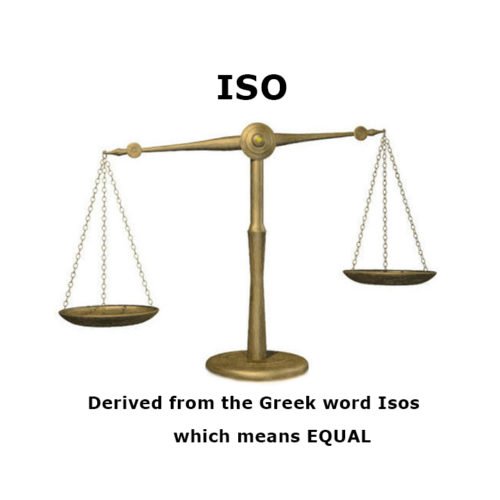
To overcome this the organisation adopted a shorten version of the Greek word ISOS meaning equal.
I think this is an effective and very practical solution that everyone can use without getting confused.
The organisation sets standards for thousands of different industries – so in any language the name ISO applies – interesting don’t you think?
The Offical ISO definition in Photography.
Do you know how to pronounce it?
This video is an interesting little clip of the reason for ISO and how you should pronounce it (not that the correct pronunciation will help your photography).
ISO and DSLR/Mirrorless Cameras - how high can you go?
As ISO is a measurement of the sensitivity of your camera’s sensor it is the sensor that determines how high you can set your ISO without totally losing all detail. In the old film camera days the ISO was what we commonly referred to as the film speed and came in nice round numbers like 100, 200, 400 etc. It was also known as the ASA (don’t ask!)
The ability of the sensor to capture sharp images in low light (IE high ISO) is one of the major factors that contribute to the cost of your camera – whether that is a DSLR or Mirrorless camera.
The good, no GREAT, news is that sensors are getting better with each new model that is brought out while prices are dropping, a major factor in the depreciating value of your camera body.
I’m not suggesting that you go out and buy the next best thing – my Nikon D7100 was all the rage when I bought it and while there are newer models out my trusty old workhorse still takes great images and does not need to be put out to pasture just yet.
Using High ISO - why you may be scared to try it.
Shooting high ISO was something I seemed to avoid – it was like a fear of the unknown.
I had some subconscious belief that all photos needed to be shot in the lowest possible ISO to get the highest possible image quality.
What is it about humans that we tend to want to stay in our comfort Zone forever?
I was pretty happy (read as comfortable) to shoot anything from ISO 100 to ISO 400 but anything beyond that was totally uncharted territory and I believed without question that if I “sailed far enough I would fall off the edge of the earth” (no offence intended to those members of the “Flat Earth Society”).
If the camera manufacturers spent millions of dollars on R&D to come up with better, faster, more accurate, greater resolution sensor’s why not at least give them the benefit of the doubt?
Trust me on this one – I went for a long “sail” in HMS/USS Nikon D7100 one day and was absolutely amazed that I was still comfortably safe way beyond ISO 2000. Eventually I pushed the old girl to her maximum standard ISO of 6400 and while a bit noisy it was a very pleasing result. A bit of LightRoom wizardry (see below) and the noise was virtually gone.
The highest ISO I have ever shot was with the Nikon D500 when the first one came into the shops here. We set it to ISO +/- 52000 ISO (no typing error) which is not the maximum on the D500 and took a photo in an almost black cupboard. WOWSER! It came out like daylight and was almost entirely without any trace of noise.
Shooting in High ISO - why your photos are noisy?
Pro Secret: Noise only occurs if the exposure is wrong.
ALWAYS SHOOT IN RAW!!!
If you are shooting very high ISO you probably will need to open your aperture (low f number), slow your shutter speed down or do both of these.
These adjustments when made in camera will greatly reduce any noise.
A problem can arise when you need a fast shutter speed (say for sport or a rock concert) where you need to freeze the action.
In these situations you may need to compromise and accept a bit of grain but it’s not the end of the world and any photo is better than no photo.
So when shooting in high ISO remember to use the slowest shutter speed you can get away with (this will depend on how fast your subject is moving) and the widest aperture.
If that doesn’t work you can make adjustments in post processing which I explain in the next paragraph.
High ISO - A Quick Fix in LightRoom or PhotoShop Camera Raw
Assuming you land up with a photo with a bit more noise then you would like, here is a quick and very effective fix in LightRoom or PhotoShop Canvas Raw.
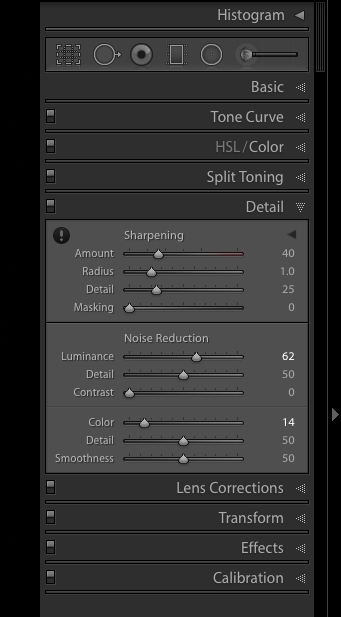
Open the image in either and go to the “sharpening” section where you will find a whole bunch of sliders. As we are only concerned with noise we will be looking at the noise reduction ones – primarily the “luminance” and “colour” sliders – and not the sharpening sliders.
- View image at 100% by clicking on the little “i” button on the left of the word sharpening seen here in LightRoom
- Move the luminance slider all the way to the right – to the 100 mark. Your image will lose much of it’s detail and will look rather plastic. Never fear Lawrence is here!
- Now move the colour slider all the way to the left and you will see some strange specks (greens and purples and other weird stuff) appear – especially in the darker areas. These may be hard to see at first as you don’t know what you are looking for so move the slider back and then back again until you see it.
- With the two sliders set at opposite extremes start nudging the colour one back to the centre until it gets to a point where those weird specks disappear. Stop! Right there is far enough with the colour slider. Mine ideal spot is anywhere between 7 and 25 depending on how high my ISO was. the lower the ISO the lower this number will be. Colour adjustment is now set.
- Head over to the luminance slider and start easing back on the slider until detail starts appearing and the image is not too plastic looking for you. Find your sweet spot. The sweet spot will also vary from photo to photo so just find a spot that you are happy with.
- That’s it you’re done for now.
After this point I do my basic adjustments in LightRoom and then head over to PhotoShop to finish off and the very last thing I do (after cropping which is my second to last adjustment) is sharpening using the “Unsharp” tool.
The Final Word on The ISO Of Your Camera - shoot the ISO that gets the job done!
So there you go – you now know:
- What ISO is – and why it is called that
- The definition of the term ISO in relation to Photography
- How high you can set your ISO for your camera – and trust it!
- How to limit the amount of noise in camera and
- How to remove noise in post-processing.
As always please leave me any comments you may have below and especially let me know if this has helped or it you disagree with me, I am always happy to debate photography and learn new stuff.
Until next time …
These technicalities are beyond my needs to date but who knows. I’ve always wanted to do more with photography. I’m not even sure what my current camera is capable of. At least I have a better grasp of my options, from reading this.
Hi Dianne.
Thanks for your comment and your honesty. Sometimes knowing the technicalities can be daunting ad confusing to the point of putting one off photography altogether. I certainly hope this isn’t the case with you or anyone else.
I keep saying that any subject, and photography is no different, is like an onion; as you peel off the first layer you find there are succeeding layers waiting to be discovered. Unravelling them and finding out new stuff really is the exciting part.
Go get yourself a photography onion and let’s get you started on your journey of discovery – be great for yoru blog to have original photos.
Thanks again for you comment.
Lawrence
This is just a bit over my head, I have to admit, but I think I understood most of it. I am going to send this article to my husband, who both enjoys photography and understands the technical aspects of it.
You did explain things rather well and I get the concept. At least I think I do.
Hello Anita.
Sorry this is over your head – might just be me being too techy which I try to avoid!!!
Anyway you are obviously a lovely wife to refer things to your hubby that may interest him. He probably knows all about it.
Thanks for your comment
Lawrence
He probably does, but I forwarded it to him anyway. He does the same for me.
Great thanks Anita.