5 Simple photography tips and techniques for the absolute beginner.
You’ve just bought your DSLR camera (a Nikon D3400 I presume 🙂 ) and have this beautiful bit of technology in your hands with no idea where to start.
Let’s give you a helping hand and get you started off on the right foot.
Contents
First ... My Guarantee to You.
These tips may seem very boring, very basic and and maybe not what you had hoped for – but there is no short cut to good photography. There is a learning curve that we all have to go through.
I fully understand as I was once where you are right now and was also very impatient to start taking National Geographic style photos immediately, but bear with me and do these basic exercises and I know your photography will improve dramatically and rapidly.
I guarantee it!
The first thing I am going to get you to do is go play – go take photos using any, and every, button and setting on your camera. Do this for a week and while you’re doing it do tip #1 each day after you have taken your photos.
Tip #1 - Read Your Manual
Spend the first week of ownership of your new camera taking a variety of photos and just generally trying to come to grips with your new toy. There’s a lot to learn and one of the best sources of information is your “User Manual” – the one that came with the camera.
I know it was written by some geek using a totally foreign language but if you spend a couple of hours a day with the camera in one hand and your manual in the other, cross-referencing what you read you will be amazed at what sinks in.
Yes it will seem daunting but reading something even once can often be recalled later – just knowing you have read about it in your manual at some point gives you the confidence to go look for it again.
- Look for buttons or settings you don’t understand and see if you can find what the manual says about them.
- Apply the setting or button and take a photo.
- Make a note of what you have discovered.
Do this every day for the first week of shooting – it becomes important as we move on to the next bit of learning.
Be sure to look up the following:
- ISO – the sensitivity of the sensor
- Shutter Speed – the length of time the shutter is open allowing light to enter and be captured by the sensor
- Aperture – the size of the opening in the lens through which the light must pass to get to the sensor
Together these three elements combine to give us the Exposure Triangle.
Download and study this document about the “Exposure Triangle.”
It may seem daunting at first but read it over and over until you at least get some understanding of the relationship between these three elements and how they work together to create a perfectly exposed and in-focus image.
Tip #2 - Putting it into Practice ... the tricky part
Note: This is the most important tip I can give you – DO NOT SKIP THIS!
In the old days photographers learned the “Sunny 16 Rule” and it applies as much today as it did then. I encourage all those I teach to learn this first before relying solely on the technology of the modern DSLR.
This rule is what the exposure triangle is all about and once learned will stand you in good stead for years to come.
Essentially it will teach you how to estimate, or read, light without having to refer to your camera’s meter. A basic but essential skill to master.
Here’s what I want you to do:
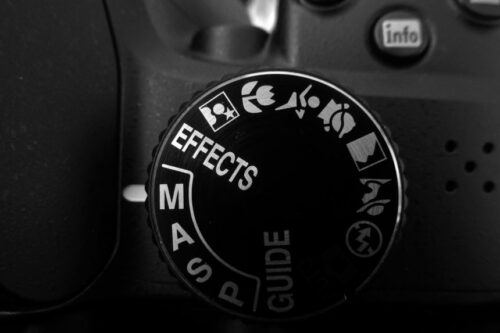
- Set your camera to manual
- Set your ISO to 100
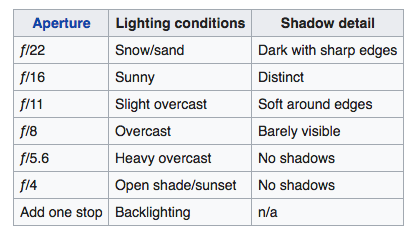
- Set your aperture to f16 (this is for a sunny day – and how the rule got its name. Adjust your aperture according to the table shown here if it isless than sunny.)
- Set your shutter speed to 1/100 th second
- Take several photos of different subjects but don’t make them too difficult like birds in flight. We are trying to get you to succeed not fail and become despondent
- Repeat steps 1-5 above on overcast, shady, very bright and gloomy days. Adjust according to the table.
- Keep doing these steps until you become familiar with the concept.
Quiz: It’s a bright day. Your subject is a dog running along the beach and you want to freeze the action. You discover that the settings of ISO 100, f16 and 1/100 produce a well exposed but out of focus photograph. What adjustments do you make to your camera?
You’ll find the answer at the end of this post.
Tip #3 - Shoot Often ... learn from each image
I hope you are getting excited about how it all works.
With your new-found skills I want you to switch things around a bit and go out and shoot any number of photos but make notes on what your settings are and what you are trying to achieve. Then when you view the photos compare them to what you read in your manual, the exposure triangle and the notes you made.
- What did you get right?
- Where did you go wrong?
- Can you do better?
- Do you understand what you did and why you git the result you did?
- Are you sorry you bought that B***** camera? 🙂
Hang in there – it gets easier and better the more you practice.
Getting well exposed photos is the first part – thereafter you move on to taking well focused images, composition and a million other things. You’ll never get bored as there is so much to learn.
Tip #4 - Get Uncomfortable ... force yourself to adapt
One of the most effective ways to get better at photography from a beginner’s’s standpoint is to get comfortable being uncomfortable.
Here’s what you do:
- Cover your rear screen (the old timers never had a screen and had to select settings based on their knowledge of photography). This will force you to very carefully select your settings based on what you have learned so far in this post.
- Select and stick to one ISO. In the days of film rolls were sold based on film speed (now called ISO) and the number of photos.
- Take only 24 photos per ISO selected and then download and study your results – how many are good enough to print?
- Use one focal length lens and “zoom with your feet”. I would suggest a 35mm or 500mm prime lens. If you don’t have one set your kit lens to one of these focal lengths and leave it there for a full month.
- Shoot in monochrome (black and white). This is an excellent way to learn how to “see” and interpret light.
- Do this for a full month – February is NOT a full month. 🙂
- Continue to read your manual as it will all start making a lot more sense.
By the end of a month of doing this you will be a fairly proficient photographer. Way better than if you simply go out and take photographs with no plan of action.
Tip #5 - Don't Try to Beat Them ... join them
Study and learn from others:
- Join your local camera club. Get involved and ask questions. In almost every case senior members of clubs are only too willing to pass on their knowledge to eager new members.
- Latch on to a mentor if one of them offers.
- Read books and watch plenty of You Tube videos.
- Join online photography forums (I am a member of Nikonites and I learned a ton of stuff there. If you don’t have a Nikon camera there are forums dedicated to other brands).
- Visit art galleries and go to exhibitions.
- Print your photos – there’s nothing quite like a print to bring the reality of your photos home to you. Ask others for constructive criticism.
- Ignore FaceBook. Let’s be honest FB is full of friends who will “like” your photos regardless. You will learn more by having them torn apart. It can be tough to take but criticism is the best way to learn where you can improve.
- Study the old masters – paying particular attention to their use of light.
- Make these actions a habit and when you become proficient pay it forward.
Conclusion - Rinse and Repeat
So there you have it – 5 simple beginner photography tips that you can put into practice from day one without having to spend a cent on new equipment or classes.
Revisit them and repeat them – often, until you feel you don’t need to.
Then repeat them once more just so be sure.
Keep reading your manual – I still find things 2 years after having bought my camera that I didn’t know it could do!
Let me know your thoughts and how you get along with these tips in the comments below.
Or feel free to contact me if you have a specific question.
Answer to the quiz question: Up your ISO to 400 and your shutter speed to 1/400. The faster shutter speed will freeze the action and the higher ISO will compensate for the lack of light.
Bingo you are a photographer.
Hi,
Loved this article especially point about 5 Beginner Photography Tips and Techniques
sharing this on facebook and pinterest
Hey Akshay
Pleased you enjoyed it and thanks for both commenting and sharing.
Going to take a look at your site as I know very little about video cameras.
I’ve shyed away from using video on my DSLR because I just feel a dedicated video is more suited to the job – even though DSLRs do take good short videos. Would you agree with that sentiment?
Lawrence