In this post I will be explaining how to correctly expose for high contrast lighting conditions to provide a well exposed photo.
By that I mean overcoming, rather than utilising, contrast lighting. Utilising contrast produces either high-key or low-key photography where the lighting is optimised to create drama.
My intention with this post is t help you overcome high contrast lighting where it would reduce the impact of your photo by having blown out highlights or hidden detail in shadows.
Let’s get started shall we …
Contents
High Contrast Lighting - Why Digital Cameras struggle with it
Modern cameras are very sophisticated technology but even the best of them is not as advanced as the human eye and brain.
Cameras are designed to provide a ver acceptable result in most average circumstances.
To get better than an average result you have to tell it what it needs to know.
The best way to do that is take control and set the camera to one of the manual modes; M – manual, A – aperture or S Shutter.
I use Manual for 99% of my photography – use what you feel comfortable with. Aperture is pretty easy to get used to if you want a suggested starting mode.
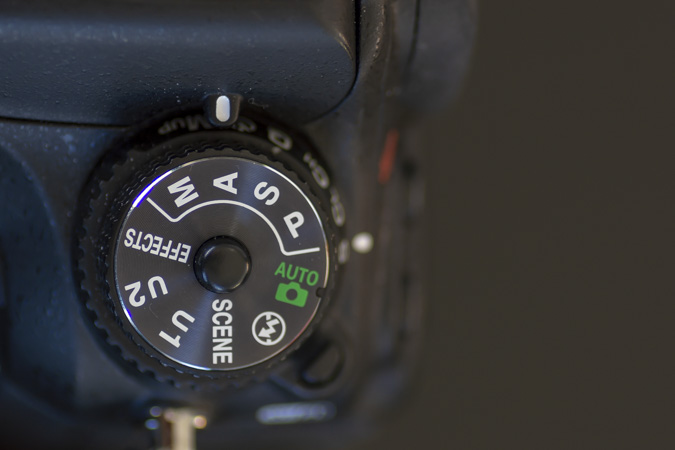
Without any changes to your settings the camera will take an average light metering (between the highlights and the shadows) and come up with what it (the camera) thinks is an acceptable result. This is often good enough – but not always.
- What about those backlit situations where a person’s face is hardly discernible but the background is fabulous?
- Or those photos of your garden where the detail in the shade just doesn’t show making a pretty average shot out of what should be a gorgeous photo of your garden that you can show off to your friends and family?
- The photo off your favourite pet which for some reason doesn’t quite look like you imagined it to be.
- And those dinner gatherings with long last seen friends that come out with barely anyone visible.
I think you get the picture (pun intended).
So what to do to overcome unwanted high contrast lighting.
Use Your Flash - The Simplest Solution
Don’t be shy to use your flash – even on the brightest of days. It is by far the easiest of options to overcome those difficult backlit situations mentioned earlier.
The worst that can happen is you will land up with a photo with “red eye” – that red spot you see on the eye when flash is used. This is overcome by a red-eye setting in camera or in post-production.
By the way “red-eye” is caused by the flash being directly above, and in very close proximity to, the lens as is the case with built-in flash. If you can get your flash off-camera, using a speed light, you overcome the problem. Watch the video to see how to use off-camera flash and how to bounce the light to diffuse it.
Using the Built-In Flash
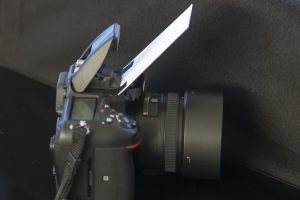
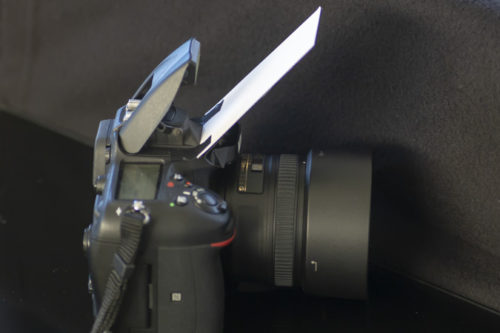
If you don’t have an off-camera set-up or if it isn’t convenient you can always bounce your on board flash by using a credit card, placed on the body of your camera, directly in front of your built-in flash.
Place it at 45 degrees (slanted towatds the subject as shown in photo right) to bounce the light off the ceiling (provided always there is a ceiling).
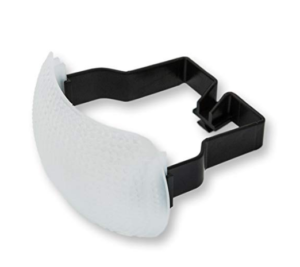
Alternatively you can use a small diffuser.
All you need is something placed between the flash and the subject to soften the light.
The Gary Fong Puffer (pictured right) is perfect for the job and is securely connected via the cameras hot shoe.
At under $20.00 this diffuser is an inexpensive and effective alternative to an off-camera flash.
Overcome High Contrast Lighting Using Camera Settings
If you should in one of the manual modes (which I highly recommend) you can override the default settings.
Any of the following methods will help and you could use a combination of one or more.
- Exposure Compensation – see my post on exposure compensation here.
- Expose for either the highlights or the shadows – see below.
- In camera HDR (High Dynamic Range) or using
- HDR software in post processing – see below.
- Use the Active D Lighting Option in the Menu – see below.
Exposing for Highlights or Shadows.
To expose for the highlights or shadows shoot in a manual mode and use spot metering.
Decide if you want detail in the shadows, the highlights or both.
- If you want detail in the shadow meter off the darkest part of the shadows knowing that the highlights will be over exposed.
- For detail in the highlights do the opposite and meter off the brightest part of the highlights knowing that you will lose detail in the shadows.
- For detail in both do as above, make a note of the settings for the two exposures. Adjust your settings (aperture or shutter speed) to a stop some where in the middle of the range. This average is more or less what the camera will do in “auto” but you can up the highlight or shadow detail as you wish – giving you more flexibility.
Overcoming High Contrast Lighting With In-Camera HDR Settings ... not ideal
Your fancy DSLR has a built-in HDR option.
The drawbacks to using the in camera HDR are:
- You cannot shoot in RAW which limits your post processing options to a certain degree
- You will need a good solid tripod as the camera will take more than 1 photo (usually 3 but some cameras can take more) to combine the results and produce one well exposed image. Each photo needs to align exactly with the others so hand-holding is not really an option.
- Not a good method for live subjects such as portraits as people move!
Using HDR Software to Overcome High Contrast Lighting
This is probably the best method of getting the perfect result.
- Unlike in-camera HDR here you can shoot in RAW – giving much more control in post processing to get the result you want.
- You still need a tripod – buy one if you’re serious about your photography it is one item you will always need.
- Not good for portraits or moving subjects
- Must have the software. I use Adobe’s LightRoom and PhotoShop but there are free versions which you can use while you pay for that lovely tripod you bought on my advice. Haha.
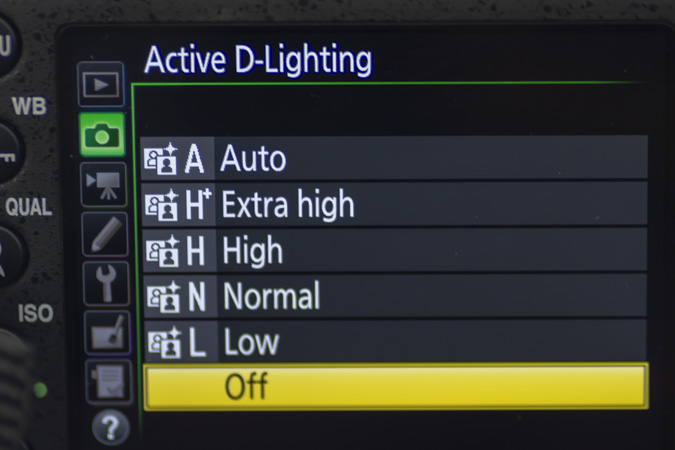
Use The Active D-Lighting Option in the Menu.
You’ll find this option under the “Shooting Menu” of your camera.
Please see your manual for details.
I used to use this option often and find it very useful. It is a form of HDR whereby you tell the camera which part of the image is in shadow or which part is bright.
It’s a pretty good for portraits and can be combined with exposure compensation to further enhance the drama or soften the shadows for the required effect.
You can select between:
- Auto
- Extra High
- High
- Normal
- Low
Using this option will often produce a better result than a flash and of course there will be no red-eye to contend with. Play around with the various levels and see what suits you.
Bounce Light Back Into The Shadows - another simple solution
This is a great way to subtly add light into shadows or faces.
Use an existing wall of grab something white (cardboard is perfect) and position it so that the available light is reflected into the shadow area.
Just beware of making it too bright and too harsh – for example a mirror would be way too much.
You can get pretty cheap multi-coloured reflectors that are lightweight and fold up to nothing.
Why multi-coloured?
Because silvers, gold and translucent reflectors are a great way to add soft light to your images.
This is a perfect solution for those backlit portraits and I use it often.
Final Word on Mastering High Contrast Lighting
Going forward you should be a lot more confident on how to handle high contrast lighting conditions.
Every situation will be different but you have the tools and now the knowledge to overcome all of them.
If the solution isn’t here I am sure with a bit of thought you will find a solution.
Let me know how you get on in the comments below – as always i love to hear from you.
In fact this article was inspired by a request Josh left me in my post on f stops – be sure to check it out.
He also asked that I do one of shooting in high ISO – which I might do next.
Happy photographing.
I am not a photo expert, but I have always wanted to take better pictures. It is a hobby, but I hate it when my family looks so dark in photos. People taught me about the manual mode in camera and the three pillars of photography, but that is too complicated for me.
Like you said, using a flash is fairly important. In a sense it is kind of like “drawing” on your pictures with a white marker so that the lighting is evened out. There are times where I couldn’t even say my wife and baby’s face in a photo. It was simply too bright outside. Maybe a flash and some hdr later will fix that.
One thing is for sure is that I have never heard of a diffuser. I guess it makes a flash less harsh when you do it front facing. $9 doesn’t sound too bad. I’m sure it will last long if I take good care of it. What do you think?
Hey Win Bill.
Thanks or your comment – I like the analogy of “drawing” with light – there is a process in photography which is called painting with light and it is literally just that.
Hopefully this post will have helped you get better photos of your precious family. As the years pass we only have photos to remember those special moments.
As you say looking after your gear definitely makes it last longer. I tend to do exactly the same and have had stuff for over 20 years – not too difficult to do.
Thanks for popping by.
Lawrence
Excellent post.
I am a pretty experienced photographer but I am still learning. It is amazing just how much there is to still know. We never really know it all.
I am regularly frustrated when the conditions are high contrast and have to choose between the background or subject. These tips are great and I will get some practice in utilising them so next time it matters I will get the shot I desire!
Thanks
Steve
Hi Steve,
Thanks for your comment.
I think of photography (and most things) like an onion. As you peel back one layer of knowledge you discover there’s another layer underneath, and one under that and …
But that’s how it should be and what makes it both a challenge and fun.
It’s quite an expensive interest though and, like an onion, can make one cry! 🙂
Have a great weekend.
Lawrence