
I found the Intuous Pro Small tablet be the best tablet for photo-editing and as such this review is predominantly about the small tablet.
The comments apply equally to the Intuos Pro Medium and the Intuos Pro Large tablets. The difference between the three models (besides the obvious size difference) is that the bigger models have more shortcut buttons on the tablet itself.
I think you will find that the Small Intuos Pro is so versatile that the options you get aren’t all utilised anyway – at least that has been my experience.
If you find you need 8 instead of 6 shortcut buttons then opt for the medium sized tablet. The large tablet just takes up too much desk real estate for my liking and is not ideal for photo processing.
Contents
Wacom Intuos Pro - Product Overview
Product: Wacom Intuos Pro Small/Medium and Large
Price Indication – subject to packages available:
Small $119.95 (Amazon Price)
Medium $377.50 (Amazon Price)
Dimensions Small: 12.2 x8.2 inches
Dimensions Medium: 13.2 x 8.5 inches
Warranty: As per Amazon’s terms and Wacom’s warrant
My Rating:
9.5 out of 10 (for the small as I haven’t used the other sizes) However as you will see below the various sizes have the same features with a few minor differences.
Wacom Intuos Pro Review
Where do I begin?
I first encountered the Wacom Intuos tablet while being tutored by my mentor – Helena Gratkowski, a photographer I greatly admire.
I was simply blown away by the difference her editing made to my image (pictured here).
Her editing skills were one thing but the ease and speed with which she did it was almost entirely due to the Wacom Tablet that she was using.
After watching her process my image (pictured here) I was hooked.

In Admiration of her skills I mentioned to her what a difference her processing made to an already good image.
She replied “Processing is everything!”
With correct processing you can lift your game from regular photographs to outstanding images.
I was hooked and knew I needed to get me an Intuos Pro Tablet.
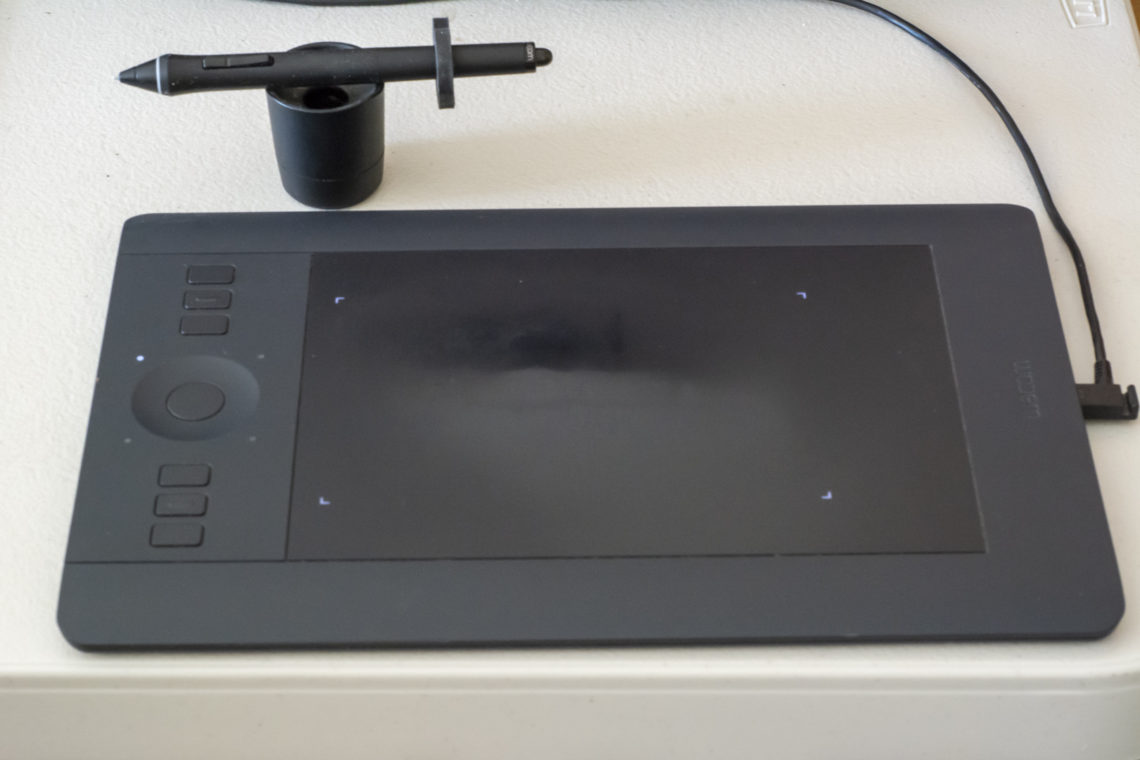
Two Hardware Components - simplicity itself
The Wacom Intuos Pro comes with two hardware components:
- The Intuos Pro multi-touch pad
- The Intuos Pro pen
Using these two in combination provides you with an enormous amount of flexibility, ease of use and speed of operation.
This allows you to:
- Complete your post processing much quicker and easier, effectively being paid more per hour and giving you more free time to do the things you want to do.
- Greatly improve your post processing skills. The pen’s sensitivity functions are so much better and so much more accurate than the traditional mouse. This transfers to your work and you will immediately notice an improvement in your production; you can see it, the clients can see it and the demand for your work will increase.
- If you are in the business of selling your services or your photos you can comfortably lift your prices and can choose the work you wish to take on and those that you can turn away.
- Stand out from your competition.
The following is a breakdown of just some functions and benefits of the Intuos Pro series – I say “some” because I haven’t experienced all the features as there are just too many and the ones I have utilized pretty much cover my requirements.
Both the pen and the touch pad can be customised to your requirements.
Multi-Touch Pad - Overview
The multi-touch pad is a souped-up version of the touch pads found on laptops – that is to say you can use it to navigate around your screen.
But way beyond that are a bunch of features and benefits that no other touch pad comes close to.
What makes it so special?
- It has a wireless function. ‘Nuff said?
- The working space itself is set within an outer frame and is highlighted by four LCD lights which indicate the corners of the screen. Everything function that you perform within these corners will occur on your screen. The size of your work space can be adjusted down to suit your own needs. If you reduce the size of your working space it still covers everything on your screen but it means you can do everything simply by moving your wrists. This is explained in more detail in the video below.
- On the left-hand side you have a series of 6 express keys – the medium and large versions have 8 express keys. These keys can be individually programmed as any of the short cuts found within your processing software. So for example to add a duplicate layer in PhotoShop the normal shortcut is “Control and J” pressed simultaneously, this now becomes a matter of pressing one button to perform the same task. Ideally you want to set these express keys up as the most commonly used functions for your work.
- In the middle of the express keys you will find a multi-function “scroll wheel” which provides for even greater customization and flexibility. The scroll wheel has 4 main options and a total of something Like 64. Personally I only use 3 of the 4 options.
- It is TOTALLY customisable and can do every single function the mouse can do, and more, with either the stroke of a hand, finger, fingers or the pen for any number of programs. This means you can set it up exactly as you want it for your needs and there are a number of ways to do.
- It is a huge time saver, and I mean huge. It takes a bit of getting used to and you will probably change some functions to suit as you go along. Let’s take a conservative number and let’s say you save 30 seconds on each of 500 images processed (not an unusual amount for a wedding photographer) – that’s a time saving of over 4 hours! Work that out in terms of your hourly rate.
- And there’s more – because of the many possible combinations it is impossible to cover all the options in a review like this. As a start though I suggest you look at the video I have posted below to give you some idea of the powerful features of the Intuos Pro and the benefits you will gain from using one.
Pro Pen - Overview
The pen is probably the best part of the whole set-up (and that is saying something) because of the versatility it offers and the speed with which you can make changes.
This is particularly so when it comes to the brush settings.
You can delete, double click, adjust brush sizes and attributes etc. all on the fly.
Although it takes some getting used to once you have practiced it a few times it’s incredibly easy and fast.
Rather than reinvent the wheel take a look at this brief introduction to the Wacom Intuos Pro.
This second video shows some even more amazing features available on the Intuos Pen and Pad and the benefits of using them.
Check today’s prices on Amazon

What Size Wacom Tablet to Invest In?
What Size Wacom Intuos Pro Should You Invest In?
This is obviously a personal choice and will depend entirely on your needs.
Most photographers go for the medium but I suspect this is very much because of our propensity to go for the middle option.
Artists who use big sweeping brush measurements will no doubt prefer the bigger pads but for photography I honestly believe the smaller pad is even too big a work space and you will reduce it.
Also consider the size of your desk and the room your Intuos Pro will take up. I have a fairly small area and anything bigger than the small would be a bit crowded.
The Small version is less expensive but equally as good as the medium and large.
What's Not To Like About the Wacom Intuos Pro Tablet?
Not much but …
- It is a learning curve that can only be mastered by continued use. There were a few times when I thought I would never get the hang of it. But trust me here – put your mouse away for a week and use only your Wacom. It won’t be much of a fun week to start but by the end of it you will be pleased you pushed through.
- I found it quite difficult to decide what settings and shortcuts I wanted to use and that too was frustrating at first, but you can always change these so don’t stress.
"Processing is Everything" - get your Intuos Pro today ...
If you want functionality, detailed control, speed and the best post-processing tablet ever then you need to get yourself one of these babies.
As Aaron said in the video “If I didn’t have a Wacom Intuos Pro I wouldn’t be doing any PhotoShop”.
Like me he uses an Intuos Pro (Small) … just saying.
Get yours from Amazon today
In my opinion it’s the best tablet for editing photos – by a long way.
You can thank me later – but get yours now so that you can get started fight away!
Hey if you have ever tried another brand or want to comment on the Wacom Intuous Pro please do so below. I’d love to hear your opinion.
Some of the links within this post are affiliate links and I may receive a small compensation from sales purchased through these links
Great post I learned a lot of new things about photography.
Thank-you sir. Photography is like an onion as you peel off one layer you discover another layer and then another and another. It’s a never ending discovery and a lot of fun.
Appreciate your comments
I have the exact same model which I use for photos and digital art and couldn’t agree more.
It’s definitely a product someone should get if they plan on doing a lot of editing or work in digital media.
For beginners, I would recommend you get a smaller size, just to get the hang of it and save on some money. Diving into the medium or large without any prior experience isn’t a bad thing, but you might be overwhelmed with the extra features that come with it.
The hand-eye coordination you have to adapt to isn’t as hard as learning to customize the tablet to your personal preferences, but I would agree that it’s not a hard tool to learn to use.
Hi Kashia
Thanks for your comments as its always nice to meet someone who uses the same gear – its somehow reassuring I think. 🙂
I absolutely agree with the hand eye co-ordination thing – hence why I have reduced the working space of my tablet. I really see no point in big bold hand movements when I can do the same with simple wrist actions.
And you have reminded me that I have processing to do for a client so i best get to it.
Thanks once again
Lawrence