Very few photographers know how to use “exposure compensation”. Understanding what it does is the first step to learning how useful it can be.
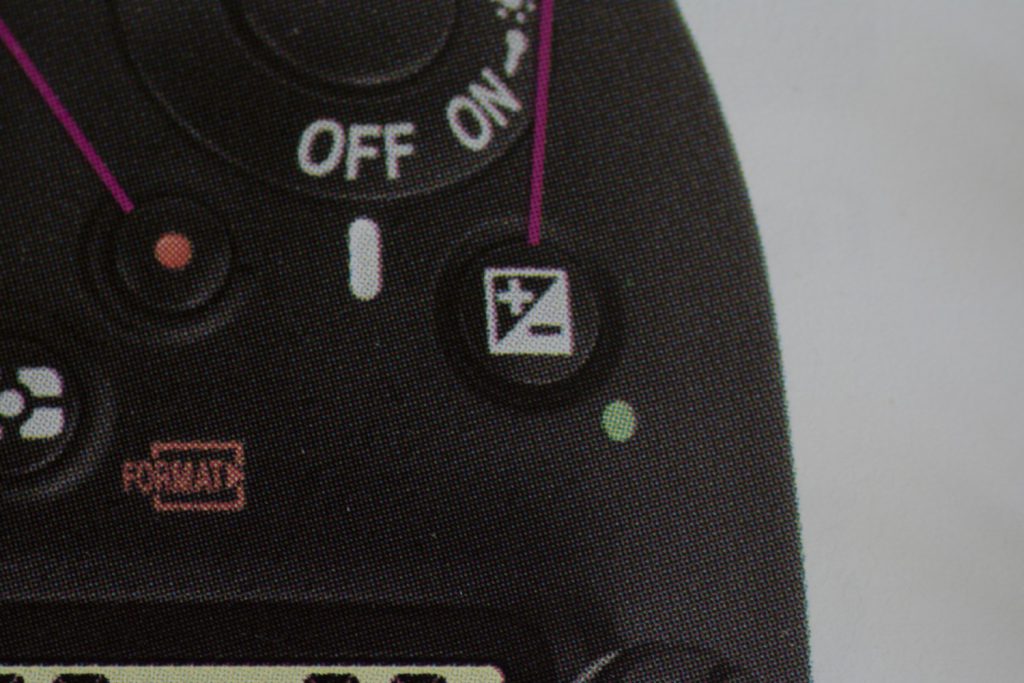
The “Exposure Compensation” function is indicated by the little plus/minus button normally situated near the shutter button.
In this post I explain how to use exposure compensation to add more depth to your photos – to give them a more three-dimensional look.
Once you understand how it works and what it can do for your photography you’ll wonder how you ever lived without it.
Contents
The Exposure Compensation Selector
Pictured here is the location of the Exposure Compensation button (the little +/- icon) located directly behind the shutter release button on the Nikon D7100.
The location of the exposure compensation selector button may differ on your particular camera and is sometimes found on the back body, or in the menu.
Note: Exposure compensation is only effective in modes other than Manual shooting mode; aperture and shutter for example. If you shoot in full manual mode, exposure compensation is adjusted by you whenever you change any of ISO, Shutter or Aperture. Using the exposure compensation function in Manual Mode is irrelevant.
I have found that it works best in Aperture Mode but suggest you play with it to see how it suits your shooting style.
Let’s get you started in giving your photos that WOW look.
Understanding Exposure Compensation
You’ve probably looked at other people’s photos of scenes you have taken and wondered how they get that three-dimensional look to their photos. You may even have been with someone on the same day and despite taking virtually the same photos as them theirs seem to pop out of the screen at you.
There are a number of factors that could be the reason for more detailed and three-dimensional images; exposure compensation is possibly one of them.
The other could be better quality lenses, a superior sensor (based on camera model), post processing techniques or different camera settings – for example a different aperture that provides a greater depth of field.
Another factor that has a big impact on your exposure is your selected metering mode of which there are essentially three.
When using exposure compensation the resultant adjustment made by the camera is based on the area of the metering mode you have selected.
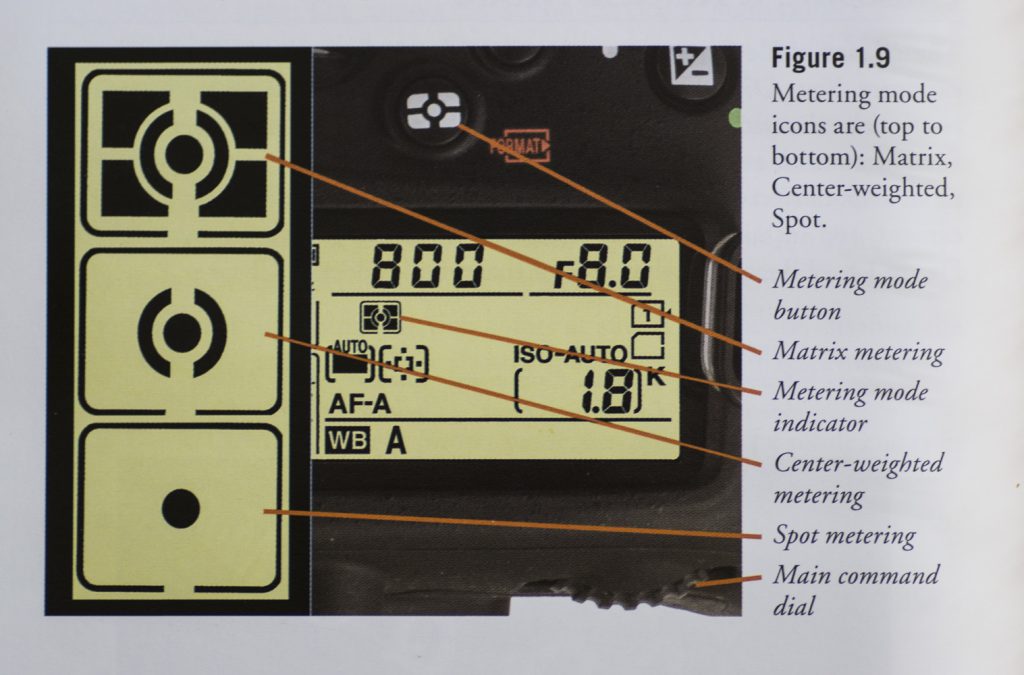
- Single Point Metering – where the camera uses a single point to measure the available light, for example on a subject’s eye. Exposure compensations will be based on the single point selected and will impact on the rest of the image to a lesser extent.
- Centre Weighted Metering – where the camera uses the average light in the centre of the frame – the entire face for example. The exposure compensation here will be based on a bigger area and be less dramatic.
- Matrix Metering – where the average of all the light in the frame is considered to find the correct exposure. The least dramatic of all as the compensation takes into account the overall lighting of the entire image – everything will be equally affected.
* The terminology used here is for Nikon – other brands have different names but they mean the same thing.
The camera selects the best combination of aperture, shutter speed and ISO based on all the settings you have told it to use. Change the settings and one of those three things (aperture, ISO or shutter speed) will need to be adjusted to have the correct exposure.
The problem is that the camera is just a machine and will do as it is told. It does not know how to adjust for different lighting situations (a function of the White Balance feature) and this is where exposure compensation becomes, not only useful but essential.
In a nutshell what exposure compensation does is override the cameras default settings allowing you to decide what should be over exposed or under exposed to produce the result you want.
Exposure Compensation in Action
For example, we all know those horrible snapshots that show a person people facing the camera with the sun behind them; you know the ones I mean where the subjects are just shadows with no (or very few) facial features visible but a lovely (somewhat darker than real life) background. The photographer’s intention was clearly to record the subject’s features and not the background. In a case like this exposure compensation would have resulted in a much better image. The background would have been over exposed but it is not the main interest of the subject.
.The photo shown here is typical of matrix metering where the camera takes all the light available and makes a good guess – the results can be less than satisfactory. Here the exposure could easily have been increased by 2 stops – it won’t matter if the background is blown out as long as we can see the person’s features.
In the event that the background was an integral part of the story.
For example to show the location, exposure compensation could have been adjusted to show detail in both the person’s face and the background.
The first photo right makes me look like such a bad photographer I would’t blame you for not taking my advice.
I intentionally took a badly exposed photo to prove a point.
Have you ever taken a portrait photo and had the image come out with the face in shadow like this?
Well the good news is it’s not entirely your fault as the camera is making the decisions based on your settings. You have control over the settings and not using the right ones is your fault.


Let’s see how post-processing and/or exposure compensation can help in this situation.
Using the same photo and tweaking it in Adobe LightRoom with a couple of sliders I can almost rescue the shot.
I say “almost” because by doing it in post-processing I have still not managed to regain all the definition but if this was the last photo ever taken of my a loved one I would cherish it regardless.
In the third photo I have up my exposure compenastion by 2 stops (+2 EV).
Now I have all the detail I want in the face at the expense of blown out highlights – but in this case I don’t care about the background highlights as they are not what I am interested in.
Now let’s look at when to use exposure compensation and why …
When to Use Exposure Compensation
You can use exposure compensation in virtually all circumstances and once you have tried it I think you may consider it on every shot.
In almost every photo there is a range of lighting or shadows and brightness. The only exception to this is when there is even lighting (yet another reason why the blue and golden hours are so popular among photographers) with no shadows or highlights.
Your cameras metering system will evaluate the lighting in the frame and indicate to you that either the ISO, shutter speed or aperture needs to change for a correct exposure.
The problem lies in extremes.
- When it is very bright (a lot of light such as on snow) the camera will under expose; naturally as there is so much available light.
- When it is very dark the camera will over expose; again this makes sense as there is a low level of light.
- When there is a big contrast in light – for example deep shadows and bright highlights. Playing it safe the camera will take and average metering and produce and average exposure and a below average result with less detail in both the shadows and the highlights.
Exposure compensation can be used in all three situations to produce a result that is suitable to you – where you control the camera not the other way around.
The advice sound contradictory – or at least it did to me when I first heard it but …
Bright Sunny Days, in Snow or on Very Light Subjects
Use your camera’s compensation exposure to increase exposure by a few stops or partial stops – how many stops will depend entirely on the situation, the camera you have and the result you want.
Trial and error will get you there and lots of practice will train you to do this instinctively in situations where there is no time to practice.
For now start by upping the exposure by 1/3 or .3
These three photos are not great photos and were taken to illustrate a point only.
To get a good image from these I would use the 3rd image and tweek it in PhotoShop – okay, okay it would need more than just a bit of tweeking!
For these images I used Aperture priority and single spot metering measured off the little gold pendant thing.
The first photo is what the camera told me was the correct setting.
Using exposure compensation the second was over exposed by one full stop and the third was under exposed by a full stop.
To my eye the third photo has more depth to it, while the pendant in the middle one has a nice rich gold colour to it. That’s what I would tweek in PhotoShop.
Other than the exposure setting all settings were identical and the 3 photos were taken within seconds of each other.
Try something similar and play around with your settings going from one extremem of the exposure compensation range to the other.
You can’t damage anything and you don’t have to share your experiments with people who don’t understand.


The detail of the spider web in the third is so much clearer than the others, while the colour of the pendant in the middle one looks better to me – this is what I would tweek in PhotoShop.
Once you have practiced this it becomes instinctive to make the changes as you view through the view finder.
Incidentally I find most of my adjustments are best when slightly underexposed – your experience could be different.
In Deep Shadows, Low Light or on Darker Subjects
Like before it seems to be a contradiction but you actually need to turn your exposure compensation down!
This one seems insane but I tried it on the face of a dark dog when I first heard about it and was amazed at the results. Try it for yourself and again start with small increments. You may be very surprised to find that you need to go up a whole stop or more in some cases.
For High Contrast Lighting
This is the hardest one of all to get right and the decision you have to make is do you want the detail in the shadow or the detail in the highlights (the sky for example). Increasing the exposure will blow out the highlights while decreasing it will darken shadows.
The best way to overcome this is to bracket your shots taking at least three images; one over exposed by a stop, one at the “correct” exposure and one under-exposed by a stop. These can then be merged to create the level of detail you want in each area. To do this you will need to use a tripod and be familiar with post-processing, although some cameras can do it “in camera”. Check your manual to see if yours is one such camera.
The same multiple-exposure method is used for HDR photography but is often taken to extremes – sometimes for effect and other times inadvertently.
Why Use Exposure Compensation
You may well suggest that today’s modern cameras are so advanced that you shouldn’t need to use exposure compensation. This is a valid point and probably what I thought a few years ago.
Let me answer it this way.
Having exposure compensation and not using it is like shooting in auto-mode. You will get some lovely photos but you will also not be taking full advantage of your very sophisticated DSLR. To me its like buying a Ferrari and having it chauffeur driven!
No Way Jose! I’m going to drive this baby to get maximum bang for my buck.
I strongly urge you to try exposure compensation; go should some bright subjects with no exposure adjustments (IE the ‘correct’ exposure) then tweak the exposure compensation up a third of a stop, then two-thirds and then a whole stop. See the difference it makes.
Do the same with a dark faced animal (is where I first noticed the power of exposure compensation) but this time turn the exposure down 1/3rd, 2/3rds and 1 stop.
Make a note which exposure you find best and in so doing learn how your camera reads light. By doing this I can now make adjustments on the fly with no need to check if I am correct.
It’s all about practice as I continually tell people. This is not something you can learn by someone saying “adjust down by 2/3 of a stop and you’re good to go” – there is just too much variation in lighting between shots.
A Quick Guide to Exposure Compensation
If I was to give a quick guide to exposure compensation it would not be a chart – I just cannot see how a chart could cover each situation.
So here is my guide:
- Use single point metering mode.
- Use the central focus point.
- Place that focus point on the darkest part of your subject and take a reading.
- Now place the focus point on the lightest part of your subject and take a reading.
- Adjust your settings to be somewhere in the middle of the two or slightly up or down.
- Take a photo (remember to make sure it is a sharp photo) and check your histogram.
- Adjust as necessary.
Last Word on Exposure Compensation
Use it, you’ll be amazed at the difference it makes and your friends will soon be wondering what you do to get such great photos. Or they may think you have a way superior camera!
I’d like to hear your views on the subject so please leave me a message below.
As always, questions are most welcome.
Until the next time …
Acknowledgment.
I am unable to take photos of my camera with my camera so the images I used on this page are images I took of images in “David Busch’s Compact Field Guide for The Nikon D7100” – my own personal photography bible.
I don’t think I have broken any copyright laws and hope he won’t mind. I can highly recommend his books as being a lot more user friendly than the manuals that usually come with the camera.

Wow, great information on exposure compensation. I had no idea that this could be the reason for some of my pictures! I will have to check my camera again to adjust the compensation.
Thanks for the info!
Hey Jacob. Thanks for stopping by.
Exposure compensation played a big part in taking my photos to the next level. I hope it does the same for you my friend.
Lawrence
Your images are stunning and so is your explanation!
When it comes to metering, what is your favorite method and why?
Good luck!
Hello Fleeky. Thanks for the compliments on the photos.
As for favourite metering mode …
I don’t have any particular favourite as I select my metering mode (and other settings on the situation) at hand.
I do a lot of portrait work and for that it is single spot metering.
For my landscapes mostly matrix metering.
So it all depends on the subject matter.
Thanks for stopping by.
Lawrence
This sure is a very interesting read. Personally I’ve always left as much as possible to the camera to adjust automatically when taking pictures. I now realize that by mastering some technical skills, far better results are possible.
Indeed something to consider.
Thanks for sharing some great insights.
Cheers 🙂
Hey Cobus (nice South African name) Thanks for stopping by and commenting. If you are still living in SA – what a great country for game safaris. Go get some for your self.
Lawrence
Hi Lawrence, thanks for this very valuable information. I’m looking to make my pictures look better and thanks to you, I should achieve this. I’ll bookmark your website for future advice.
Hi Ben. Thanks for your comments. Glad I could help.
Lawrence
This post was very informational. I am going to bookmark it in order to show my husband. he and I both love taking pictures, but he has more knowledge about our Nikon camera. I am just a point and shoot person, but after reading this article, I understand I can take better pictures by learning the features of our camera.
I love taking pictures of birds and the deer that come to eat at the bird feeders.
I can not wait to try the exposure compensation.
Thank you
Hello Lee Ann. How lovely of you to share your love of photography with us. And your husband is a Nikon man like me!
Bird feeders are a great way of getting some lovely shots. Now that you mention it I may post on a good set-up for taking great photos of them.
I love getting comments from readers as it gives me so many ideas.
Best of luck with your online business
Hello,
i was wondering that if you use exposure compensation on Aperture Priority, can it be changing the ISO as well as the shutter speed.. or it changes the shutter speed until it might get blurred and raises the ISO from that point on?
I also thought the when using the EXPOSURE compenstion on the nikon… the exposure bar would change.. moving the blocks from the right to the middle accordingly.. but that does not seem the case? Is this correct?
Thank you for all your clear advice
Hi Guy,
Great questions. Really love that you have taken a look at this so intently.
In aperture mode exposure compensation does indeed change the shutter speed – essentially you are manually overriding the camera’s program and something must give, and that something is the shutter speed. Increase exposure and the shutter slows down, decrease it and the shutter speeds up.
I guess your question is related to increasing the exposure causing the shutter to slow down. In that event the camera will not change the ISO simply because it “assumes” you want the particular settings you have chosen. You and I have different hand-holding capabilities in terms of getting tack sharp photos. I’m a bit wobbly and cannot really take anything sharp below about 1/60th of a second, depending on the focal length and weight of the lens I am using. So for me that would be when the blur kicks in. I have a friend who can hold a camera dead-steady at 1/10th of a second.
But no camera can possibly know who is how steady so the camera only changes the ISO – you would need to adjust the ISO yourself.
Now for the final part of your question – not sure which Nikon model you are using but on my Nikon’s (I’ve had 3) the exposure blocks all increased or decreased on the exposure bar in the viewfinder – its the only way to know exactly what effect the exposure compensation will have on your final image. Hence I am surprised to read that your Nikon isn’t doing this. It may be a setting in the menu but I can’t find anything like that in my Nikon D7100’s menu.
Very strange as that bar is essential to determining the exposure.
Hope that helps and thanks once again for your awesome questions.
Lawrence